Instruction Material for Intense Pulsed Light IPL750LS-HR Permanent Hair Removal SystemQuick Setup Guide, Treatment Overview & Techniques
In the interest of providing superior equipment, Bio Avance Beauty Industries reserves the right to modify or amend equipment specifications without notice or obligation. This IPL Machine is Approved For: Permanent Hair Reduction, Spider - Varicose Vein Reduction, Skin Toning, Body Sculpting, Photo Rejuvenation, Hyper Pigment - Age Spot Reduction, Tattoo Reduction, Wrinkle Reduction, Scar - Stretch Mark Reduction, Rosacea, Sun Damage, Blemish (mole, wart, skin tag) Reduction, Nail Fungus Treatment and More.Bio Avance Beauty Industries Ltd. Order The IPL750-LS Here (link)Intense Pulsed Light Progressively Permanent Hair Removal
The IPL can be considered an excellent replacement
for laser hair removal as the
Like laser, IPL will injure the cells which are responsible for hair growth by way of thermolysis (heat in the follicle tissue). This trauma is just below the threshold of injuring other cells (notably skin) around the follicle. IPL works best on clients who have light skin combined with dark hair growth. Should a hair follicle survive the IPL treatment, it will grow back slower and thinner. After a series of treatments the continual ‘site specific’ localized trauma to the follicle tissue will eventually destroy all hair growth. Once destroyed, the follicle cannot produce another hair. Discomfort and Client Reaction
Remarkably, the sensation felt with an IPL treatment
is no more intense than that of a laser (although much more total
energy is being delivered to the tissue). The first few pulses from
the IPL generally are not felt by the client. Pulses 5-6 (if the
technician chooses to deliver that many) begins to feel like a snap
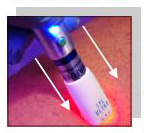
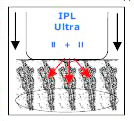
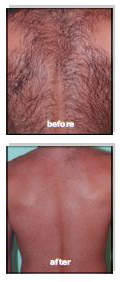
of a r Pre-Treatment Preparation First spray the area with a lidocaine or benzocaine topical numbing compound. Now coat the IPL emitter tip with the cooling and coupling gel included with your kit. The patient will be able to withstand as many as 8-10 pulses per 2.5 cm2 without much sensation. It is generally not necessary to deliver more than 7 pulses for effective hair removal treatment (maximum pulse freq. setting 3). IPL Hair Removal Variation 1 This procedure is the most popular among professionals as it requires only shaving prior to the application. It will be necessary to remove all hair above the skin with a razor. Any hair which protrudes above the skin may cause pits in your optics which will reduce the overall efficiency of the device. Turn your IPL driver to maximum pulse frequency (setting 3) with HF assist enabled. Place the IPL emitter port against the skin in the area where the unwanted hair growth is occurring. Press the trigger switch down for 1 second delivering eight total emissions equating to 220 jcm2 of energy density) then move to the next treatment area and repeat. The treatment will effectively damage or destroy most or all anagen follicles in an area of 2.5 cm2 which have dark pigment. IPL Hair Removal Variation 2: Deep Tissue Trauma With Follicle Extraction with Carbon Dye
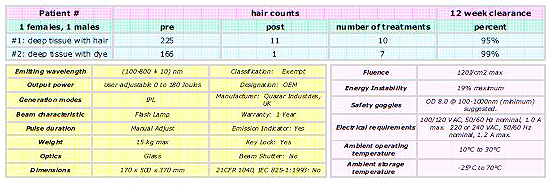
Before applying treatment, remove all hair from the area by tweezing or waxing. IPL hair removal is most effective when applied to an empty follicle shaft. Human hair simply does not normally have enough pigment to allow for sufficient heat exchange to cauterize, desiccate and necrotize the cells which produce hair. To compensate for this lack of ‘quantitative’ and ‘qualitative’ photon targets, it will be necessary to place a high-density carbon dye inside the follicle prior to treatment. Using a cotton-tipped applicator, completely cover the treatment area with the special dye included in your kit. Massage the dye into the follicle pore with a firm downward circular motion. Repeat 2-3 times to saturate the follicle pore. Use an ethyl alcohol based wipe (isopropyl alcohol will not dissolve the dye) clean the excess from the surface of the skin. At this point you will have all desired follicles visibly highlighted with a dark spot. Perform the standard IPL treatment as outlined in ‘IPL Hair Removal Variation 1’ as normal. Don not over treat. Applying 7 or more pulses to the same area may result in a burn (leading to blistering). Treatment Efficacy Permanent hair removal is a gradual process which takes 90 days or more for complete destruction of the follicle tissues. Each hair must go through its entire growth cycle for it to be effectively treated. Generally, it is only during the early anagen phase that it is vulnerable to destruction. The following chart will give you an accurate example of what the reduction in growth activity should look like from 30, 60 , and 90 days of treatments.
Important Considerations for Safe IPL Hair Removal Treatment
Treatment Around or Near the Eyes:
Great care must be exercised when working near the
eyes. The IPL emission is powerful enough to actually penetrate the
eyelid and permanently damage the eye. Having the patient close
their eyes is not satisfactory protection. The use of a
dark-colored damp wash cloth which is folded over four times will
deflect the harmful radiation; however, only IPL protective eyewear
is recommended.
Treatment Around or Near Mucus Membranes: IPL radiation will severely damage the tissues inside the nose and ear canal. Treatment should be avoided in these areas altogether. Treatment Around or Near the Genitals: IPL hair removal is safe for application to the pubic regions including the reproductive organs of both sexes. Care must be taken into consideration in these areas due to the increased level of neural sensitivity. Treatment Around or Near the Areola (nipple): IPL hair removal is safe and effective on hair growth which occurs from the areola of both sexes. Post-Treatment: The skin surrounding the treatment area may experience short-term erythmia (reddening) which will subside within 12-24 hours. Should the treatment area show signs of excess scabbing you may wish to reduce the overall treatment time or intensity. The application of a post-treatment cooling and healing gel (such as Aloe) is encouraged to speed healing and reduce sensitivity. Instruct the patient to refrain from applying cosmetics or sunbathing for at least 24 hours. Over Treatment: Each IPL pulse sends a photon ‘bundle’ deep into the skin where it damages the hair follicle tissues. This IPL radiation also will have mild effects on capillaries and skin tissue. If too many IPL pulses are administered the capillary network will begin to break down. This will create a bruise which will take several days to subside.
The general rule is to patch test the skin with 7 pulses then send the patient home. Have them back in the office in 24 hours to observe the reaction. If there is no burning or bruising, administer the full treatment. It is not recommended to deliver more than 10 pulses to one stationary area at a time. If more than 10 pulses are delivered the technician should make a small circular motion with the IPL head to avoid sending all the energy through the exact same entry points. IPL Startup Procedure Put on your IPL eyewear before powering up your system. Wear the eye protection throughout the entire procedure.
Place the IPL head in a secure position POINTED AWAY from you and the client. Turn the key lockout switch clockwise to system status IPL ‘Enabled’. At this time your digital pulse counter readout will show the number of pulses since the last reset. A bright LED on the instrument will begin flashing. The flashing blue warning LED means your IPL is now live and extreme care must be exercised while handling to avoid accidental eye-exposure. Activate the HF ‘Enabled’. The red and yellow warning indicators will confirm this operation. Set power level for treatment. It is recommended to start out on setting 2 then work your way up to 3 if client discomfort is minimal. The use of a lidocaine pre-treatment spray or an IPL coupling gel reduces discomfort substantially WARNING: This IPL instrument emits photon intensity equivalent to an arc welder and many times the intensity of the sun. It must be handled with great care. Do not allow person into the treatment room who are not wearing ANSI certified IPL protective eyewear. In addition, this instrument emits high intensity shortwave radiation which also poses risk to the human eye. Never treat on the eyes. The eyelid provides no protection. IPL and shortwave radiation will pass easily through and may seriously damage the retina and/or lens resulting in loss of vision quality. Technical Specifications Input: 110-240V AC, 30A Output: 23,000mW (pulsed) Spectrum: 410-1200nm UV Radiation: None Safety Considerations: Eye Protection It is recommended to use the IPL in high pulse mode (setting 3) at all times. This will allow the technician to deliver single pulses each time the trigger switch is pressed. If the switch is held down, the IPL driver will deliver a steady series of pulses at approximately 7 per second. This is the ideal rate for most treatments. IPL Emitter Port Maintenance Intense Pulsed Light treatments should be performed on shaved (or waxed) skin. In photo epilation, the follicle being targeted is about 0.25-0.5cm (1/8 to 1/4 in) below the skin (the follicle and papilla). To best reach the desired tissue under the skin it is best to remove the hair from the surface of the skin. If using carbon or photoreactive dyes, remove any excess which may come in contact with the optics using ethyl alcohol. For light maintenance use acetone or alcohol on a cotton tip applicator. For more aggressive cleaning use a sharp blade (scalpel or razor blade) to scrape any carbonized material from the tip. IPL Control Locations/Feature Descriptions
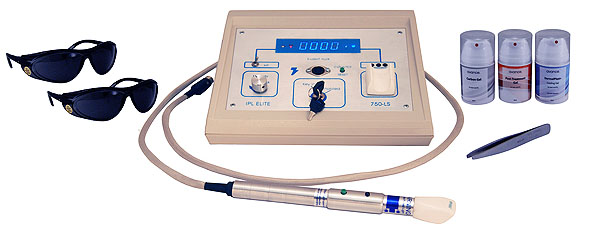
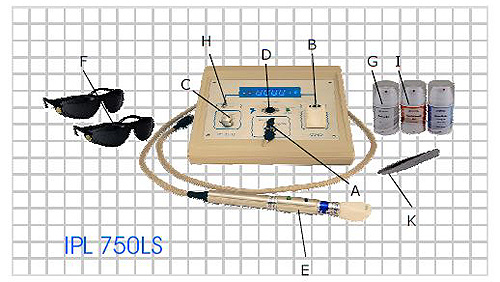
A. Key Lockout: This feature is required by law on all high-power laser and light devices. The first step in the correct sequence to power-up your laser is to turn this clockwise using the special key included in your kit.B. System Status LEDs: These lights will indicate system status (neutral or live) and which modality is enabled.C. Pulse Control: This allows the operator to set the number of IPL/RF pulses per second. D. IPL Jack: An eight-prong coaxial power jack for the IPL hand piece. E. IPL Instrument: A 23,000mW high intensity pulsed light and high powered RF emitter instrument with thumb switch and counter reset button. Note: F. Eyewear: This is an essential part of the treatment process. Direct or reflective IPL radiation can seriously injure the eye. Both the technician and the patient must use the protective eyewear while the IPL is enabled or activated. Eyewear is intended for accidental exposure only. Never stare directly into an IPL emission. G. Carbon Dye: This is an atomized form of molecular carbon which easily penetrates deeply into the follicle shaft. The dye adds pigment which gives a receptor for the photon/heat exchange reaction. H. HF (High Frequency): This switch enables or disables the secondary function HF energy mode to amplify the thermolysis effects of the IPL treatment. J. Dermal-Plast: A special 3.5% lidocaine gel formula to reduce patient discomfort. K. Post Treatment Gel: Anti-androgen formula that reduces the rate of hair re-growth and speeds healing of the skin following IPL treatments. Nail Fungus IPL Treatment Procedure
Begin by having your client soak their feet for 20
minutes in warm water with
IPL Application
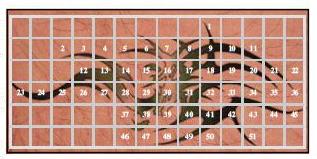
Each 10mm square should be treated with five pulses
of high power IPL energy (180 jcm2). Use a grid layout as shown
below. Areas that have ample carbon dye only require a single
pulse. Areas without carbon dye should be treated with seven
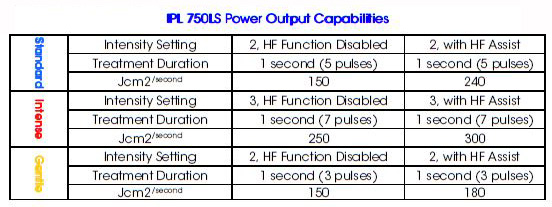
Schedule the client for a follow up in 7 days. For complete destruction of the fungal infection, the entire nail must be allowed to completely grow out (pushing the diseased nail outward and allowing a healthy nail to replace it). This procedure can take up to 6 months. Treating the client each 7 days is the best protocol as the technician can gauge the results. Each subsequent treatment session will require substantially less time as healthy nail overtakes the nail bed. Post Treatment Care The use of an OTC anti fungal cream should be applied each day. A 30 day supply has been included with your kit. Client should discard all old footwear and socks. The virus lives in these materials and cannot easily be sanitized. The use of new footwear is the best way to avoid having the fungus return to the nail bed. Advise the client to wash their feet with soap and water daily. IPL 350-LS Instrument The IPL 750-LS comes with a 300jcm2 maximum fluence per second adjustable pulse frequency (fixed pulse duration) instrument for superior operator control. The addition of high frequency shortwave energy substantially amplifies the thermolysis deep in the tissue for greater intensity and improved results. RF enhanced IPL treatments enable a greater range of treatments. Trouble Shooting Should you encounter technical problems with your IPL 750 system, refer to the following guide for potential problems and the appropriate solution. —Unit is plugged into the wall, all accessories are correctly inserted into the unit but no IPL output is being registered. ++Check all connections. Plug and unplug each one being sure all contacts are sound. ++Check all cords. Due to continual bending and fatigue, wires may fray or break resulting is full loss of power. —Unit hums or makes abnormal noises. ++Unit needs servicing. A clicking sound is normal. —IPL output is weak. ++Emitter may be obstructed with debris (dried coupling gel, dirt etc.). Clean thoroughly with a cotton tipped applicator and alcohol. If the performance of the IPL does not improve after cleaning the head your unit needs servicing by a qualified agent. Contact technical support for assistance. —No output from the IPL is registered after all trouble-shooting suggestions listed above have been checked.
IPL Resurfacing and Photo-Rejuvenation IPL resurfacing is performed using a beam of light energy which vaporizes the upper layers of damaged skin at specific and controlled levels of penetration. The procedure offers many advantages which others do not have.
Unlike
Microdermabrasion,
the IPL penetrates deeply into the dermis where promotion of
collagen proteins can be stimulated. Chemical peels can be very
unpredictable and dangerous while an IPL can be dialed in to deliver
precisely the right amount of
All resurfacing treatments work essentially the same way. First, the outer layers of damaged skin are stripped away. Then, as new cells form during the healing process, a smoother, tighter, younger-looking skin surface appears. For superficial or medium resurfacing, the IPL can be limited to the epidermis and papillary dermis. For deeper resurfacing, the upper levels of the reticulas dermis can also be removed. Varied penetration allows treatment of specific spots or wrinkles. It's also important to consider the length of recovery when choosing among the skin-resurfacing alternatives. In general, the more aggressive the resurfacing procedure is, the more prolonged the recovery is likely to be. "Light" resurfacing procedures, such as superficial chemical peels or superficial IPL resurfacing, offer shorter recovery times. However, these lighter procedures may need to be repeated multiple times to achieve results comparable to those achieved with more aggressive techniques. General Dermatology Treatment of additional skin afflictions such as Rosacea, Fine Wrinkles, Sun Damaged Skin, Acne Scars, Age Spots, Large Pores, Acne Prone Skin. As the IPL goes over the dermis, vascular spaces with hemoglobin in them absorb the light energy thereby heating the surrounding tissue and stimulating the fibroblasts to produce type 1 collagen and dermal proteins. The treatment rearranges and/or replaces the solar elastosis in the upper dermis, resulting in NEW collagen formation.
Treatment Procedure: Resurfacing and Wrinkle Reduction
Deliver 5 pulses (approximately 220 joules) to each
area of 2.5 cm square. Be very
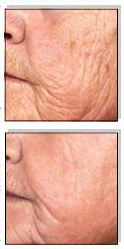
Figure 1 shows normal sagging and wrinkling of the skin which can be expected as humans age. Figure 2 shows excellent improvement on a 47 year old female after 6 treatments. Always use an approved cooling and coupling gel with your IPL treatments. This will substantially reduce patient discomfort and protect the dermis from excessive thermal retention or damage from heat. It will also increase the ’translucency’ (rate of which the skin will allow IPL energy to pass through) factor which improves overall results. Call your patient back in for a follow up in 48 hours. Additional treatments may be applied in 7-10 days depending on the level of dermal trauma the patient experience and their rate of healing. Treatment Procedure: Rosacea
Apply ‘IPL Spider Vein Treatment Gel’ (see back page
of pamphlet for ordering
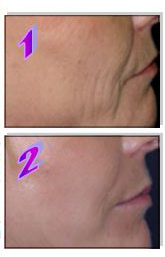
Deliver 5 pulses on high power (approximately 220 joules) to each area of 2.5 cm square. Be very systematic and thorough but resist the temptation to over treat. Figure 1 shows severe late stage Rosacea of a 30 year old male. Figure 2 shows the substantial improvement achieved with 20 treatments over 24 months. Spider veins and enlarged capillaries require more treatments overall than most other laser procedures. Treatment Procedure: Age Spots
This condition is caused by melanin deposits in the
skin which do not fade. Normal
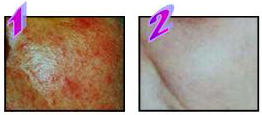
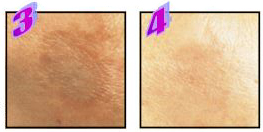
Apply ‘IPL Wrinkle Treatment Gel’ (see back page of pamphlet for ordering information). Deliver 4 pulses (approximately 200 joules) to each area of 2.5 cm square. Fading of the age spots (also known as ’liver spots’) will be evident after 4-6 weeks. Figure 3 shows moderate age spot activity on a 46 year old female. Note the improvement in figure 4 showing nearly complete regression of the skin disorder. This patient underwent 3 treatments over 11 weeks. Treatment Procedure: Scars
This condition can be caused by any trauma to the
skin from acne, sun burn, cuts, scrapes and surgical procedures. To
reduce the appearance of the scar, it will be necessary to rebuild
the collagen proteins in the skin with IPL radiation. This
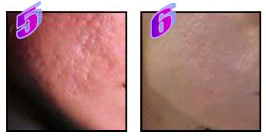
Apply ‘IPL Scar Reduction Treatment Gel’ (see back page of pamphlet for ordering information). Deliver 4 pulses (approximately 220 joules) to each area of 2.5 cm square. Remember, applying more than 220 joules may burn the skin so this procedure must be done very carefully. You must deliver the seven pulses in under one second for maximum thermal heat exchange in the tissue (simply hold the trigger switch down). Figure 5 shows a 28 year old female with acne scarring which was left over from teenage puberty. There are very deep pocks, which are the hardest to improve. In figure 6, the appearance of the scars (including the pock) has improved 90%. Treatment around the eyes must be done with adequate protection. Exposure to IPL radiation (even through the eye lid) can permanently injure the eyes up to and including vision quality loss. Photos are for example purposes only and may not indicate results which will be achieved on every patient. Medical IPL treatments for dermatology purposes are rated by improvement and not by cure. Many skin conditions such as Rosacea may return and require future treatments to be controlled. Advise your patient to expect improvement but caution them as to which degree of improvement they will be able to achieve. IPL Tattoo Removal To begin the process it will be necessary for you to scrub the skin over the tattoo with an abrasive applicator. This is will remove the outer layers of the epidermis which will allow for greater penetration of the IPL radiation.
Using a depilatory wax or epilation paper, remove all hair from the tattoo area. Hair growth will block some of the IPL radiation from entering the tattoo. Follicles in the skin of the tattoo will also be permanently damaged by the radiation which may not be desirable to your patient. Apply the pre treatment TCA enhanced cooling and coupling gel to the tattoo. This is a very important step which should not be omitted. Although the gel does contain the desensitizing compound lidocaine it will be quite common for the patient to feel some burning in the minutes and hours following the procedure. If the patient requests extra relief, apply a cold pack as needed. The Treatment Procedure Carefully power up your IPL (see page 3). Dial in full intensity ‘high’ pulse frequency setting 3. Place the optics side down (in contact with the skin) on top of the tattoo.
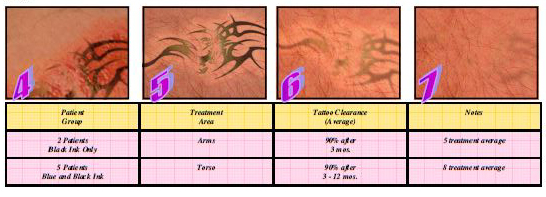
Deliver 4 pulses (approximately 220 joules) to each area of 2.5 cm square (depending on color). Be very systematic and thorough, but resist the temptation to over treat. Applying more than 220 joules per cm2 may burn the skin. Black ink can be successfully treated with 150 jcm2. Blue and green normally requires 180 jcm2, and red requires up to 300. The example tattoo at right would require 1530 pulses for a total of roughly 5,000 joules. In picture number 4, you can see some of the redness, swelling and scabbing which may show up 1-3 days following treatment. In picture number 5 and 6, you can see some fading of the tattoo, but also a mild form of hypo pigmentation (loss of the patient’s natural skin color). This condition is temporary and will subside as the melanin regenerates with natural healing.
In picture number 7, you can see that the tattoo has faded to a point where it is not recognizable. This type of tattoo should require about 6 treatments over 7 months. It is always a good idea to take pictures of your patient’s treatment areas to show them the steady improvement. This will help them to stay committed and motivated as the process requires a substantial investment of time. Replacement Parts 1-888-621-4484 IPL Eyewear Eyewear # D-213-4600 Each $39.95 IPL750 Emitter Tip Replacement
IPL # D-213-6700 Each $139.95 Carbon Dye 50ml Carbon Dye # P-213-2500 Each $29.95 Carbon Dye 50ml Gel Carbon Dye # P-213-2505 Each $29.95 IPL Tattoo/Wrinkle Treatment 50ml Gel Stock # P-216-2500 Each $29.99 IPL Spider Vein Treatment 50ml Gel Stock # P-216-2600 Each $29.99 IPL Pre Treatment Lidocaine 3.4% 50ml Gel Stock # P-216-2607 Each $29.99 IPL Nail Fungus Treatment 50ml Gel Stock # P-216-2509 Each $29.99 IPL Wrinkle Reduction/Skin Toning Treatment 50ml Gel Stock # P-216-2709 Each $29.99 Prices are subject to change without notification. To order on-line, go to https://centre-biotechnique-avance.com For technical assistance beyond what this manual provides, please e-mail support@centre-biotechnique-avance.com Please allow 24 hours for processing. The IPL 750-LS produces IPL radiation which can be harmful to the eyes. Always wear protective eyewear while operating this equipment. Intense Pulsed Light has the capability to burn the skin if the technician does not closely observe the patient’s reaction to the procedure. IPL treatments will result in destruction of hair follicles and is irreversible. Always plan ahead before undertaking detail work such as eyebrow shaping or hairline contouring. Patch test a small area (no larger than 1cm by 1cm square) before full application. Allow 24 hours to determine the patient’s reaction before applying full treatment. -- Home -- -- Products -- -- Technical Support -- -- Ordering Online -- Can't find what you are looking for? Search the Avance Beauty catalog HERE |

 results
and overall procedure are similar in many ways. It can be noted
that IPL treatments are more efficient due to the substantial
increase in overall energy being used (which equates to less overall
treatment time).
  ubber
band (as the tissue absorbs and retains the energy). Seven or more
pulses in less than one second may be uncomfortable for some
clients. The use of a topical desensitizing spray or pre-treatment
cold pack will alleviate most sensation.

 Before
connecting your IPL instrument to the main system, be sure the key
switch is off (counter and indicator LEDs will be off). Failure to
adhere to the start-up procedure may cause damage to your IPL
emitter.
 antimicrobial
soap. This will sterilize the feet and loosen the nail for carbon
dye application. Dermatophytic onychomycosis (commonly called ‘nail
fungus’) is
 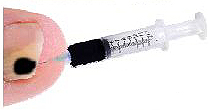 Using
the special blunt ended syringe carefully slide the micro-tube under
the nail as shown. Inject the carbon dye and saturate the area
where the fungal infection is highest. It is not important for the
dye to penetrate all areas as the laser itself will destroy the
fungus in these hard to reach areas effectively. The use of carbon
dye amplifies the laser heat and creates a much more effective
thermal destruction of the fungus.
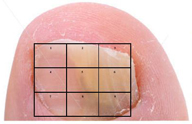 pulses
per 10mm squared. Each nail will require 20 to 30 seconds of IPL
treatment. The time to do both feet (all ten nails) is
approximately 3 to 5 minutes.
 radiation
to produce safe and effective results.
 systematic
and thorough, but resist the temptation to over treat. Applying
more than 220 joules may burn the skin.
  information).
This formula contains activated phylloquinone, which supports
healthy regeneration of new capillaries (reducing the recurrence of
future Rosacea) by strengthening the capillary walls.
  melanin
will darken (proliferate) with exposure to sun, but will also fade
over 4-6 weeks when the exposure is stopped. It is most common in
the elderly but occurs in all ages. IPL treatments are remarkably
effective for this affliction.
  process
is extensive (especially in cases where severe scarring exists). It
may take 5-10 treatments over 12 months to achieve desired results.
